| 執筆バージョン: Unreal Engine 5.1 |
こんにちは。エンタープライズエンジニアの方井です。
Landscapeについて調べたことがある方は、以下のページを目にしたことがあるのではないでしょうか?
Unreal Engine でのカスタム ランドスケープ インポータの作成 | Unreal Engine ドキュメント
一度でもカスタムランドスケープインポータを作成したことある方であれば「そうそう、簡単に言えばその通り!」と感じますが、そうでない方はページに記載通り、ビルトインされていて豊富な機能を持つ.PNG実装や.RAW実装を見ながら必要な実装を探ることとなります。
そこで今回は、とても簡素なカスタムランドスケープインポータのプラグインを作成しながらこのページを理解しようと思います。
※注意:エクスポートには対応しません。
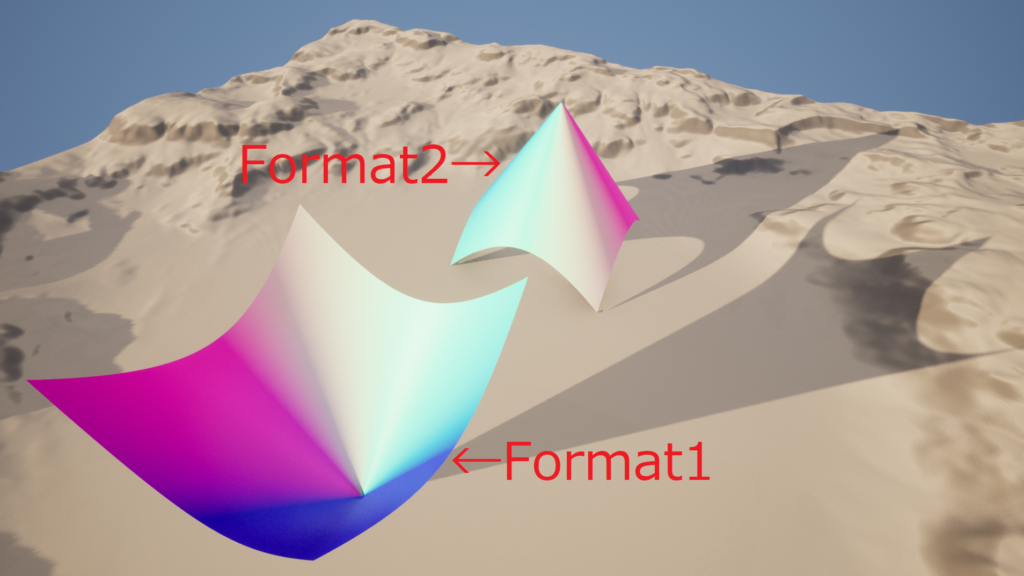
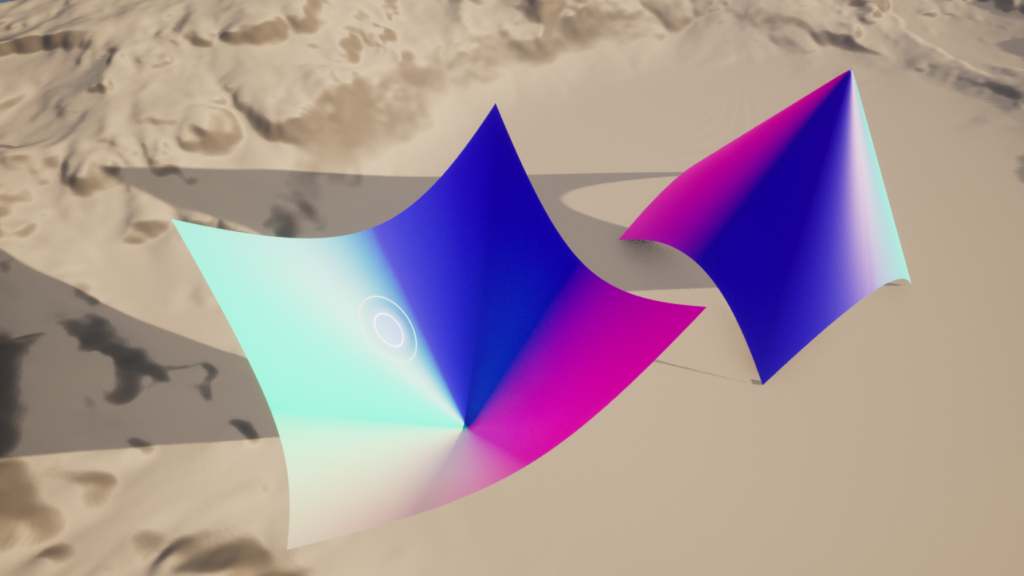
今回のプラグインを作成することで、以下の2つの単純なテキストファイルを読み込んで、図のようなそれぞれ小さなLandscapeを作成することができます(わかりやすいようにPixelNormalを表示するMaterialを割り当てています)。
1. プラグインを作成する
ドキュメント通り、プラグインによるカスタムランドスケープインポータを実現するため、自作プラグインを作成します。
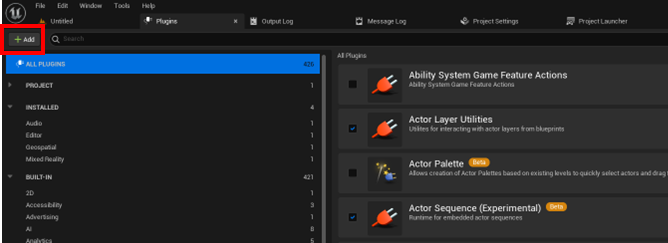
EditからPlugins画面を開き、Addボタンで新規プラグインを作成します。
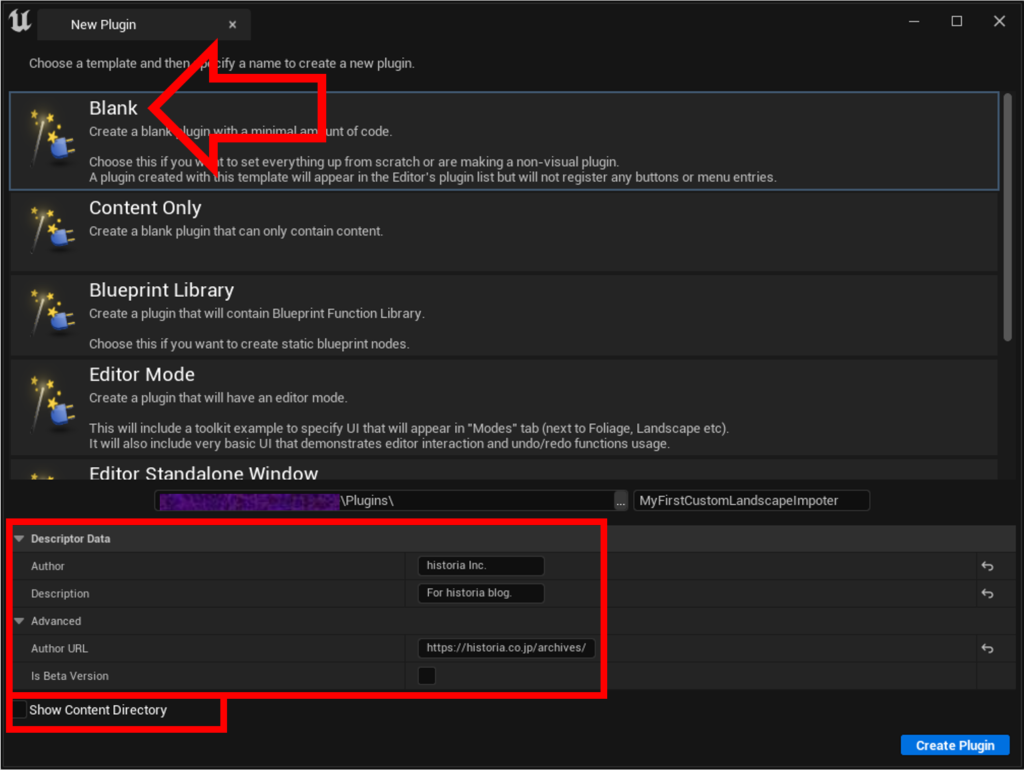
New Plugin画面では、Blankテンプレートを選択し、詳細情報を記載していきます。
- Author:実装者
- Description:プラグインの説明
- Author URL:実装者を示すURL
- Is Beta Version:ベータ版か否か(trueの場合、プラグインを有効にした際にベータ版であることを示すダイアログが表示されます)
また、このプラグインではコンテンツを含む予定は無いため、Show Content Directoryをfalseにします。
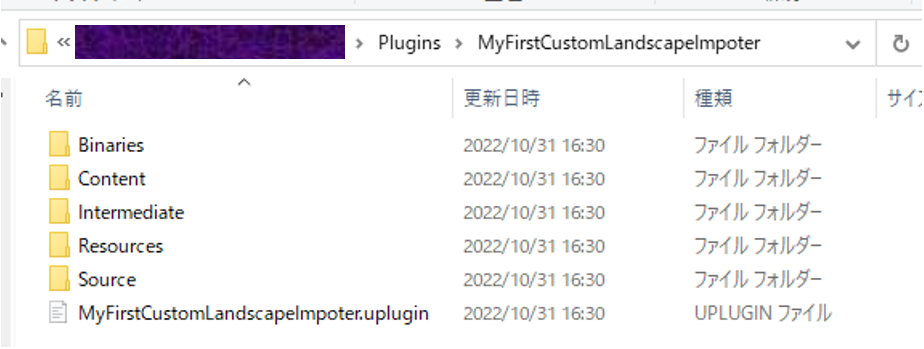
Create Pluginボタンを押すことで、プロジェクトのPluginsフォルダにプラグインが生成されます。
2. プラグインの設定を行う
作成したプラグインの.upluginファイルを編集します。
Modulesにある<Module名>のTypeを”Runtime”から”Editor”へ、LoadingPhaseを”Defalut”から”PostEngineInit”へ変更します。(おそらくModule名とプラグイン名は同一かと思います)
|
|
"Modules": [ { "Name": "MyFirstCustomLandscapeImpoter", "Type": "Editor", "LoadingPhase": "PostEngineInit" } ] |
変更する理由(Type)
このプラグインはLandscapeを作成する際に利用される機能を提供します。UE5.0.3時点ではRuntime中にLandscapeを作ることはできないため、このプラグインがPackageに含まれないようEditorのみであることを明示する必要があります。
変更する理由(LoadingPhase)
LandscapeEditorのModuleの初期化が終わった後にこのプラグインの初期化を走らせたいからです。
この変更が無ければ、このプラグインが初期化時に参照するLandscapeEditorのModuleがロードできません。(ロードの順番は未定義なので、通る場合もあります)
3. Moduleの設定を行う
作成したプラグインにあるModuleの.Build.csファイルを編集します。
PublicDependencyModuleNamesに”LandscapeEditor”を追加します。
|
|
PublicDependencyModuleNames.AddRange( new string[] { "Core", // ... add other public dependencies that you statically link with here ... "LandscapeEditor", } ); |
これにより、今回必要な”LandscapeEditor”でPublic公開されている機能を利用することができます。
4. ILandscapeHeightmapFileFormatを実装するオブジェクトを作成する
ILandscapeHeightmapFileFormatはインターフェースクラスのため、C++クラス ウィザードを利用して継承クラスを作成することはできません。
プラグインのSource/<Module名>/Privateに直接ファイルを作成していきます。

ヘッダファイルを以下のように記述します。
1 2 3 4 5 6 7 8 9 10 11 12 13 14 15 16 17 18 19 20 21 22 23 24 25 26 27 28 29 30 31 |
#pragma once #include "CoreMinimal.h" #include <numeric> #include "LandscapeFileFormatInterface.h" /** * */ class FMyCustomLandscapeFormatImporter : public ILandscapeHeightmapFileFormat { private: FLandscapeFileTypeInfo FileTypeInfo; TArray<std::string> supportTexts; const uint32 width = 256, height = 256, zeroHeight = std::numeric_limits<uint16>::max() / 2u; public: static const FString extension; public: FMyCustomLandscapeFormatImporter(); virtual const FLandscapeFileTypeInfo& GetInfo()const override { return FileTypeInfo; } virtual FLandscapeHeightmapInfo Validate(const TCHAR* HeightmapFilename, FName layerName)const override; virtual FLandscapeHeightmapImportData Import(const TCHAR* HeightmapFilename, FName layerName, FLandscapeFileResolution ExpectedResolution)const override; }; |
まず変数ですが、対応する拡張子、GetInfo関数で返すためのFLandscapeFileTypeInfo、Validate関数で使用するTArray<std::string>、そしてLandscape自体の縦横の大きさ、海抜0を示す数値です。
今回はミニマムに進めるため、Landscapeの大きさを縦横256とします。
zeroHeightを定義しているのは、数値0が高さ0を表すわけではないからです。uint16でLandscapeの高さは表現され、(uint16)0は最低点、つまりマイナスの海抜を示します。そのため、uint16の中央値を海抜0として定義することで利便性向上を図っています。
参考:Unreal Engine でカスタム仕様の高さマップとレイヤーを作成する | Unreal Engine ドキュメント
続いて関数ですが、これら3つが、あのカスタムランドスケープインポータのドキュメントのページにある通りのオーバーライドする必要がある関数です。(4つ目のExport関数はエクスポートしないため実装しません)
ソースファイルは以下のように記述します。
1 2 3 4 5 6 7 8 9 10 11 12 13 14 15 16 17 18 19 20 21 22 23 24 25 26 27 28 29 30 31 32 33 34 35 36 37 38 39 40 41 42 43 44 45 46 47 48 49 50 51 52 53 54 55 56 57 58 59 60 61 62 63 64 65 66 67 68 69 70 71 72 73 74 75 76 77 78 79 80 81 82 83 84 85 86 87 88 89 90 91 92 93 94 95 96 97 98 99 100 101 102 103 104 105 106 107 108 109 110 111 112 |
#include "MyCustomLandscapeFormatImporter.h" #include <fstream> #include <iterator> #include <numbers> #include "Math/UnrealMathUtility.h" #undef LOCTEXT_NAMESPACE #define LOCTEXT_NAMESPACE "LandscapeEditor.NewLandscape" const FString FMyCustomLandscapeFormatImporter::extension = TEXT(".txt"); FMyCustomLandscapeFormatImporter::FMyCustomLandscapeFormatImporter() { // add MyCustomFormat to Landscape importer valid formats FileTypeInfo.Description = LOCTEXT("FileFormatMyCustomFormat_HeightMapDesc", "MyCustom HeightMap .txt files"); FileTypeInfo.Extensions.Add(extension); FileTypeInfo.bSupportsExport = false; // Add Formats supportTexts.Emplace("Format1"); supportTexts.Emplace("Format2"); } FLandscapeHeightmapInfo FMyCustomLandscapeFormatImporter::Validate(const TCHAR* HeightmapFilename, FName layerName) const { FLandscapeHeightmapInfo ret; // open file std::ifstream txtFile(TCHAR_TO_ANSI(HeightmapFilename)); if (!txtFile) { ret.ResultCode = ELandscapeImportResult::Error; ret.ErrorMessage = LOCTEXT("Import_HeightmapFileReadError", "Error opening heightmap file"); return ret; } // read file std::string txtText; txtFile >> txtText; // check text if (!supportTexts.Contains(txtText)) { ret.ResultCode = ELandscapeImportResult::Error; ret.ErrorMessage = LOCTEXT("Import_HeightmapFileFormatError", "Error incompatible heightmap format"); return ret; } // return success FLandscapeFileResolution ImportResolution; ImportResolution.Width = width; ImportResolution.Height = height; ret.PossibleResolutions.Add(ImportResolution); return ret; } FLandscapeHeightmapImportData FMyCustomLandscapeFormatImporter::Import(const TCHAR* HeightmapFilename, FName layerName, FLandscapeFileResolution ExpectedResolution) const { FLandscapeHeightmapImportData ret; // validate file once again const FLandscapeHeightmapInfo info = Validate(HeightmapFilename, layerName); if (info.ResultCode == ELandscapeImportResult::Error) { ret.ErrorMessage = info.ErrorMessage; ret.ResultCode = info.ResultCode; return ret; } // get text std::ifstream txtFile(TCHAR_TO_ANSI(HeightmapFilename)); std::string txtText; txtFile >> txtText; // make Landscape data from text ret.Data.Empty(ExpectedResolution.Width * ExpectedResolution.Height); ret.Data.AddUninitialized(ExpectedResolution.Width * ExpectedResolution.Height); // Format1 if (txtText.compare(std::string("Format1")) == 0) { const float maxDistance = FVector2D::Distance(FVector2D(0, 0), FVector2D(ExpectedResolution.Width / 2, ExpectedResolution.Height / 2)); for (int32 y = 0; y < int32(ExpectedResolution.Height); y++) { for (int32 x = 0; x < int32(ExpectedResolution.Width); x++) { const int idx = y * ExpectedResolution.Width + x; const float distance = FVector2D::Distance(FVector2D(x, y), FVector2D(ExpectedResolution.Width / 2, ExpectedResolution.Height / 2)); const uint16 data = zeroHeight * (distance / maxDistance) + zeroHeight; ret.Data[idx] = data; } } } else if (txtText.compare(std::string("Format2")) == 0) { const float maxDistance = FVector2D::Distance(FVector2D(0, 0), FVector2D(ExpectedResolution.Width / 2, ExpectedResolution.Height / 2)); for (int32 y = 0; y < int32(ExpectedResolution.Height); y++) { for (int32 x = 0; x < int32(ExpectedResolution.Width); x++) { const int idx = y * ExpectedResolution.Width + x; const float distance = FVector2D::Distance(FVector2D(x, y), FVector2D(ExpectedResolution.Width / 2, ExpectedResolution.Height / 2)); const uint16 data = zeroHeight * (1 - (distance / maxDistance)) + zeroHeight; ret.Data[idx] = data; } } } else { ret.ErrorMessage = LOCTEXT("Import_HeightmapFileFormatError", "Error incompatible heightmap format"); ret.ResultCode = ELandscapeImportResult::Error; } return ret; } #undef LOCTEXT_NAMESPACE |
初めにコンストラクタです。ここでGetInfo関数で返すFLandscapeFileTypeInfoを設定します。対応拡張子には”.txt”を追加します。また、エクスポートには対応しないため、”bSupportsExport”にfalseを設定します。
また、冒頭で挙げたテキストかどうかを判別するために、TArray<std::string>へ対応する文字列”Format1″, “Format2″を追加します。
2つ目はValidate関数です。ここでは、選択されたファイルがこのインポータに対応しているかをチェックします。
まずテキストファイルを読み込みます。ファイル入力ストリームを利用して、ファイルを開きます。ファイルが開けなければ、その旨を返します。
ファイルを開くことができたら、区切り文字まで文字列を読み込みます。
続いてテキストの確認です。読み込んだ文字列が、コンストラクタで追加した文字列のどれでもなければ、その旨を返します。
最後まで到達した場合は成功なので、今回サポートするLandscapeのサイズを返します。
3つ目はImport関数です。ここで正式にファイルを読み込み、Landscapeの高さデータを構築します。
まず、もう一度テキストを読み込みます。Validate関数を通しているため、ファイルを開いた際のエラーチェックは不要です。
次に、Landscapeの高さデータの配列の領域を確保します。TArray::AddUninitialized関数を使うことで、初期化を走らせることなく大量の領域を確保することができます。
最後に、Formatごとに高さデータを代入していきます。各Formatで、以下のルールで高さを決定しています。
- Format1:中央からの距離を計算し、距離が遠いほど高さが最大に近付きます。
- Format2:中央からの距離を計算し、距離が近いほど高さが最大に近付きます。
以上でカスタムランドスケープインポータを作成することができました。
5. カスタムランドスケープインポータをLandscapeEditorに登録する
仕上げに、作成したカスタムランドスケープインポータを登録します。登録は、プラグインのStartupModule関数で行います。
1 2 3 4 5 6 7 8 9 10 11 12 13 14 15 16 17 |
#pragma once #include "CoreMinimal.h" #include "Modules/ModuleManager.h" class FMyCustomLandscapeFormatImporter; class FMyFirstCustomLandscapeImpoterModule : public IModuleInterface { public: /** IModuleInterface implementation */ virtual void StartupModule() override; virtual void ShutdownModule() override; private: TSharedPtr<FMyCustomLandscapeFormatImporter> myCustomImporter; |
1 2 3 4 5 6 7 8 9 10 11 12 13 14 15 16 17 18 19 20 21 22 23 24 25 26 27 28 29 30 |
#include "MyFirstCustomLandscapeImpoter.h" #include "LandscapeEditorModule.h" #include "MyCustomLandscapeFormatImporter.h" #define LOCTEXT_NAMESPACE "FMyFirstCustomLandscapeImpoterModule" void FMyFirstCustomLandscapeImpoterModule::StartupModule() { // This code will execute after your module is loaded into memory; the exact timing is specified in the .uplugin file per-module myCustomImporter = MakeShared<FMyCustomLandscapeFormatImporter>(); // regist my format ILandscapeEditorModule& LEM = FModuleManager::GetModuleChecked<ILandscapeEditorModule>("LandscapeEditor"); FString extensions = LEM.GetHeightmapImportDialogTypeString(); if (!extensions.Contains(FMyCustomLandscapeFormatImporter::extension)) { LEM.RegisterHeightmapFileFormat(myCustomImporter.ToSharedRef()); } } void FMyFirstCustomLandscapeImpoterModule::ShutdownModule() { // This function may be called during shutdown to clean up your module. For modules that support dynamic reloading, // we call this function before unloading the module. } #undef LOCTEXT_NAMESPACE IMPLEMENT_MODULE(FMyFirstCustomLandscapeImpoterModule, MyFirstCustomLandscapeImpoter) |
まず、ヘッダファイルに今回作成したカスタムランドスケープインポータを保持するTSharedPtrを宣言します。
次にソースファイルです。ヘッダファイルで宣言した変数に実体を代入します。
そして、LandscapeEditorModuleを取得します。ランドスケープインポータとして対応済みの拡張子リストを取得し、もし今回の拡張子”.txt”が対応していなければ今回のカスタムランドスケープインポータを対応拡張子として登録します。
以上でカスタムランドスケープインポータの作成が完了しました。実際に使ってみましょう。
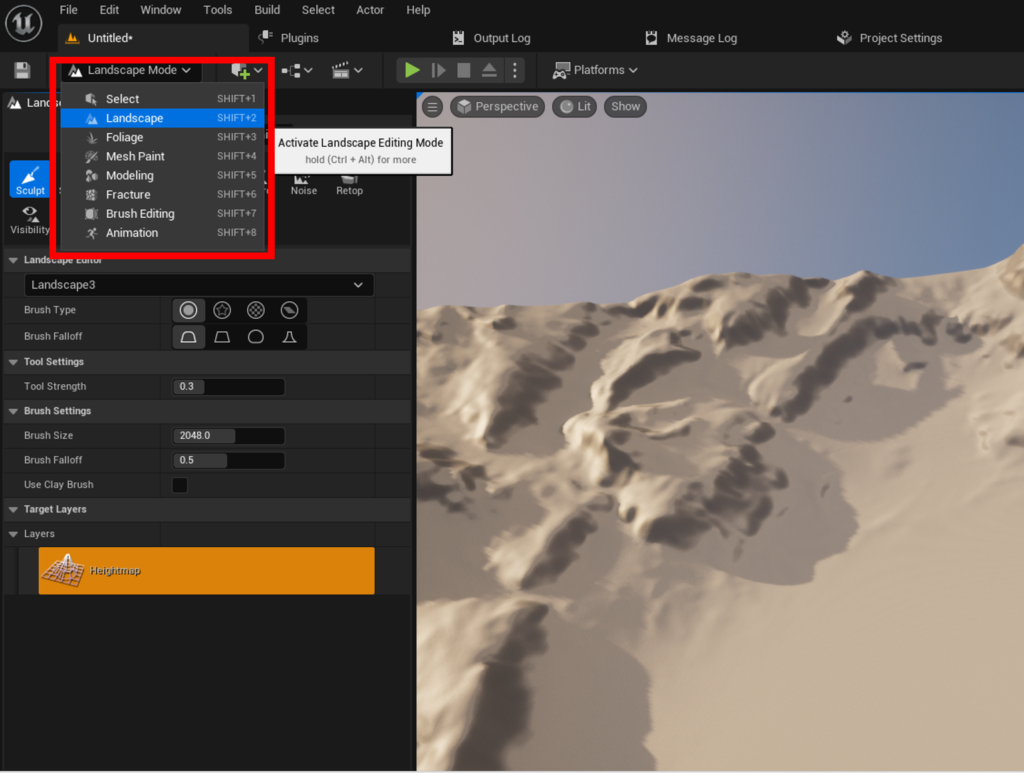
UE5では”Shift+2″もしくは左上のDropdownメニューからLandscapeEditorを開くことができます。
続いて、”Manage”→”New”→”Import from File”と選択し、ランドスケープインポータ画面を表示します。
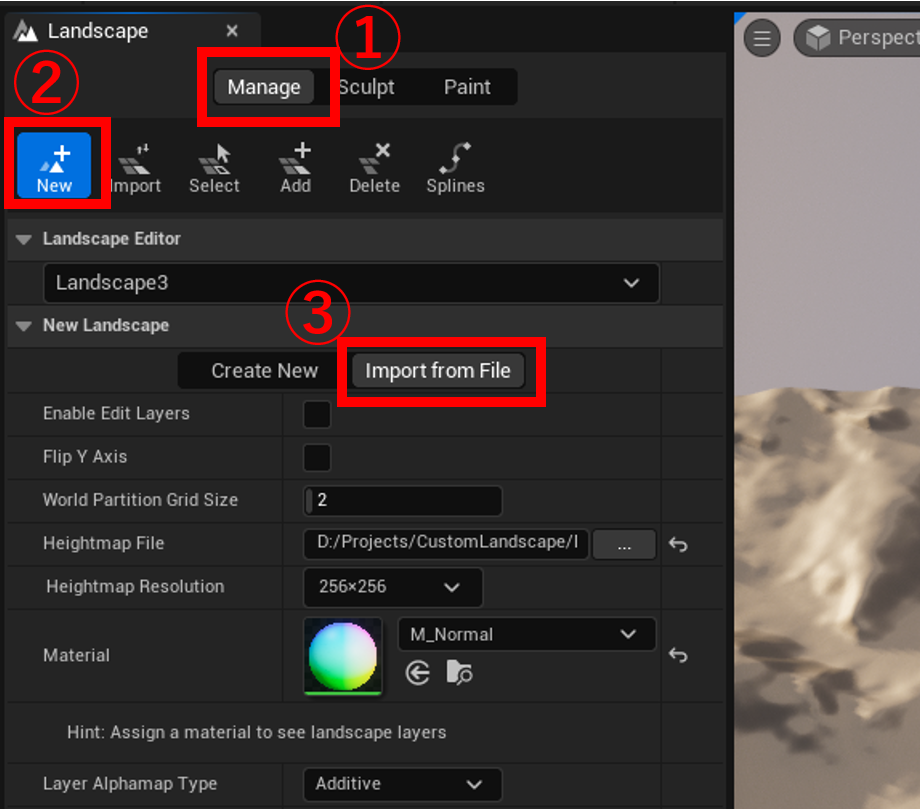
Heightmap Fileのファイル選択ダイアログを表示し、対応拡張子に先ほど記述した拡張子とその説明が表示されれば成功です。
冒頭に挙げたFormat1.txtとFormat2.txtを読み込ませれば、以下のようなLandscapeを得られると思います。
以上で動作確認も完了しました。おめでとうございます!これであなたも好きなファイルからLandscapeを生成することが可能になりました!!
お気付きの方もいるかと思いますが、今回読み取ったテキストファイルの代わりに画像ファイルなどの2次元データを対応拡張子とし、そのファイルの各要素をそのまま高さデータへ入れることで16bitPNGのように直感的なHeightmapを利用できるようになります!!
PNG画像やRAWファイル以外の、高さデータをLandscapeに変換したい時はぜひ作ってみてください!!!
 [UE5]簡易的なタワーディフェンスを作ってみよう!
2026.02.13UE
 [UE5]カメラの距離でマテリアルの明るさを変えよう
2026.02.11UE
 [UE5] カテゴリの表示順を操作する
2026.02.04UE


