執筆バージョン: Unreal Engine 5 Early Access
|
こんにちは、エンジニアの森です。
今回は、UE5で新たに追加されたGame Featuresプラグインの紹介です。
Game Featuresプラグインとは
Game Featuresプラグインは、プレイヤーの行動(攻撃スキルなど)をはじめとしたさまざまな機能を1つの「アクション」という単位で実装し、ランタイム中に自由に付け外しが出来る仕組みです。このような構造で実装することで、それぞれの機能を依存性が少なく実装が可能です。
まず、このプラグインはどういったものなのでしょうか?
以下は、ざっくりとした概念図です
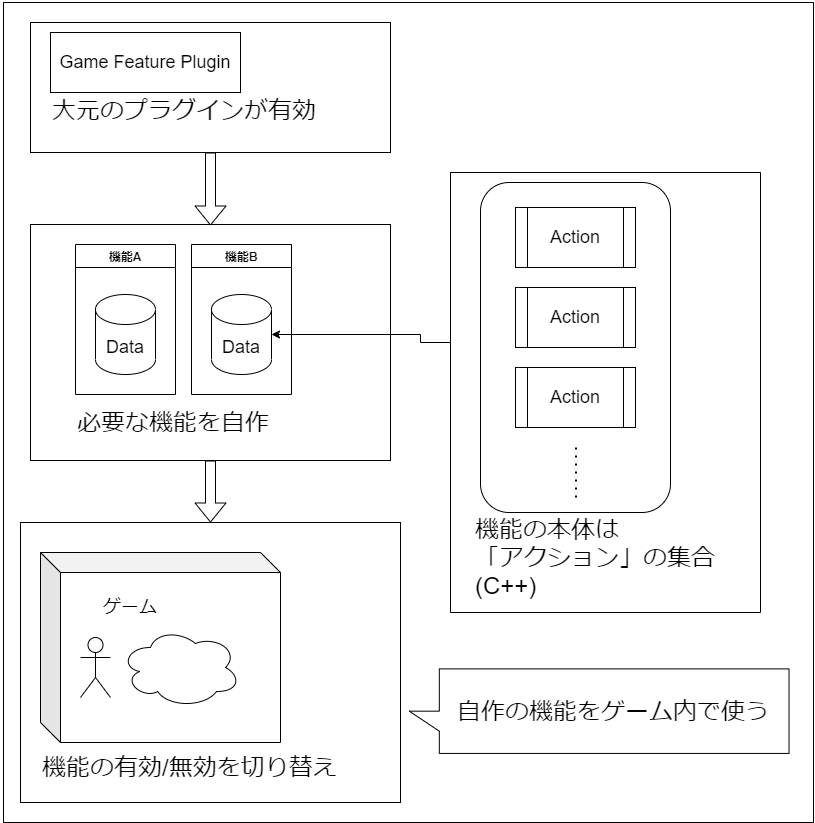
大元のGame Featuresプラグインを有効にすると、ユーザーが自分のプロジェクト用にFeatureを作成できるようになります。
このFeatureひとつひとつはプラグインです。
Featureの中に自動生成されるGame Feature Dataに、「アクション」と呼ばれる処理を追加していくことで、Featureの読み込みにあわせてそのアクションに通知が飛ぶという流れになっています。
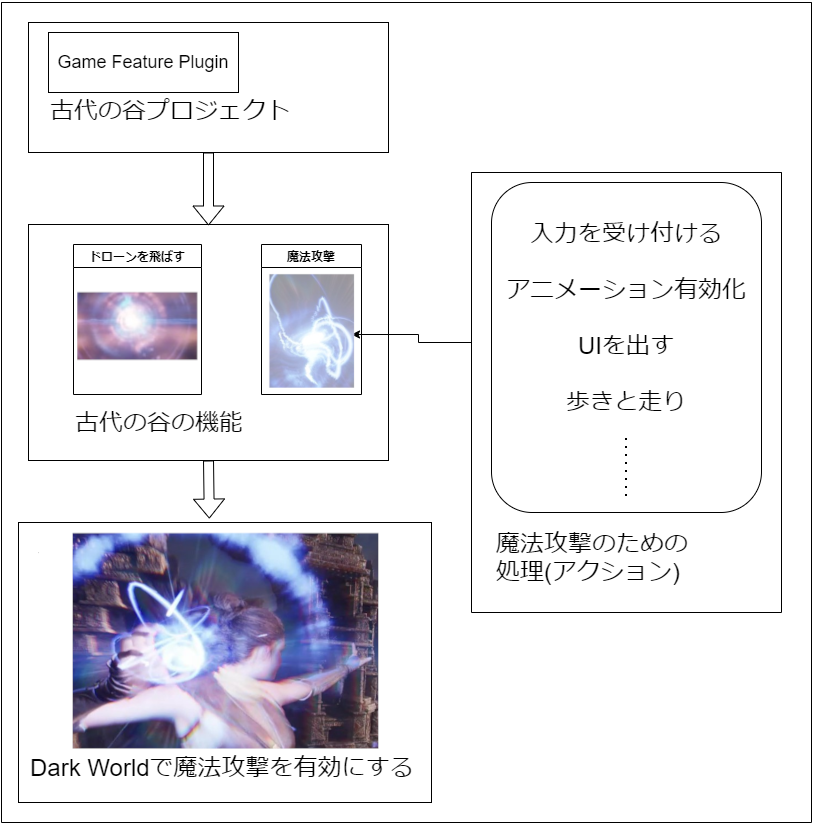
実際に、UE5の公式デモである「古代の谷」(導入はこちらの記事を参照)の例を上の図に当てはめてみましょう。
何となくイメージが掴めるでしょうか?
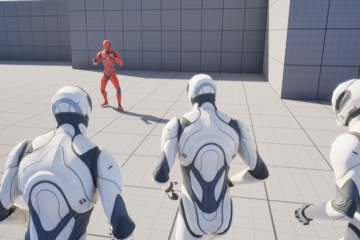
古代の谷では、ドローンを飛ばす機能と、プレーヤーキャラの魔法攻撃をFeatureで作っていました。
↓古代の谷の魔法攻撃
魔法攻撃Featureのデータアセットを見ると、以下の画像のようになっているのが分かります。
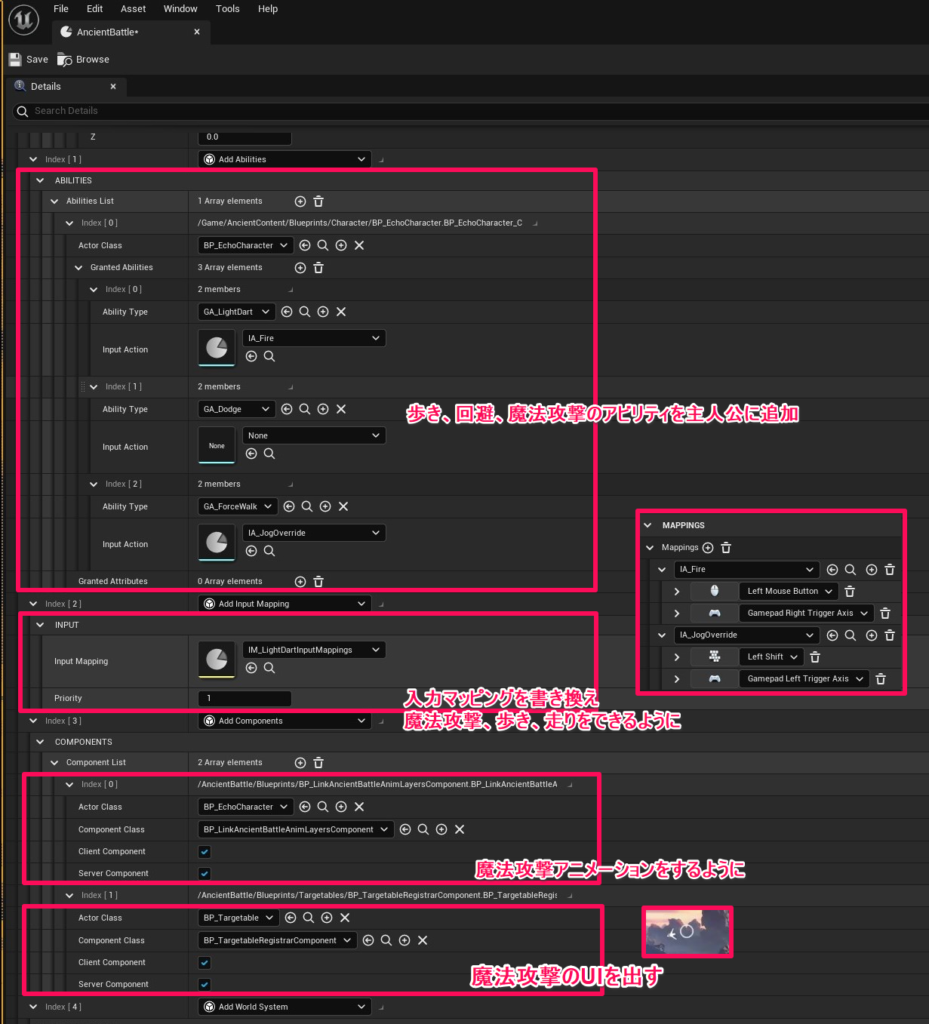
入力応答についてはEnhanced Inputを利用しています。
アニメーションはAnim BPの中でAnim Layer Interfaceを一枚噛ませることで差し替え可能にしていますね。
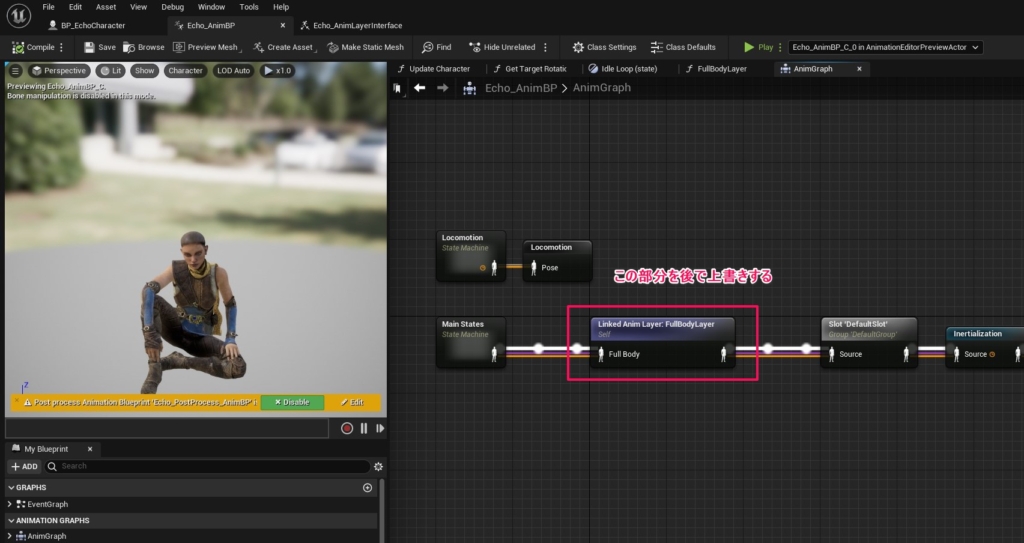
例えば、アニメーションの変更部分、BP_LinkAncientBattleAnimLayersComponentをNoneに変えると、魔法攻撃時のアニメーションがなくなります↓
他にもいろいろ触ってみると面白いかもしれません。
Featureが持つ「アクション」の基底クラスはUGameFeatureActionです。
このクラスを継承すると、新規アクションを追加できます。
基本的にはC++で自作することになりそうですが、プリセットもいくつか用意されています。
UE5で用意されているプリセットを簡単に表にしてみました。
| 名前 |
機能 |
使い方 |
| Add Cheat |
Cheat Manager Extensionを用いてデバッグコマンドを追加する |
自作のCheat Manager Extensionクラスを指定する |
| Add Component |
コンポーネントを動的に追加する
UGameFrameworkComponentManagerに登録されたアクターが対象 |
アクタークラスとコンポーネントクラスを指定する |
| Add Data Registry |
プロジェクトにデータレジストリを追加する |
データレジストリを指定する。 |
| Add Data Registry Source |
データレジストリにデータレジストリソースを追加する |
データレジストリとデータレジストリソースを指定する |
これら4つについての詳細な説明は省きます。詳しく知りたい場合は公式ドキュメントをご覧ください。
実際に使ってみる
この機能、自分のプロジェクトでも使いたいと思います。
今回は以下のようなものを作ってみます。
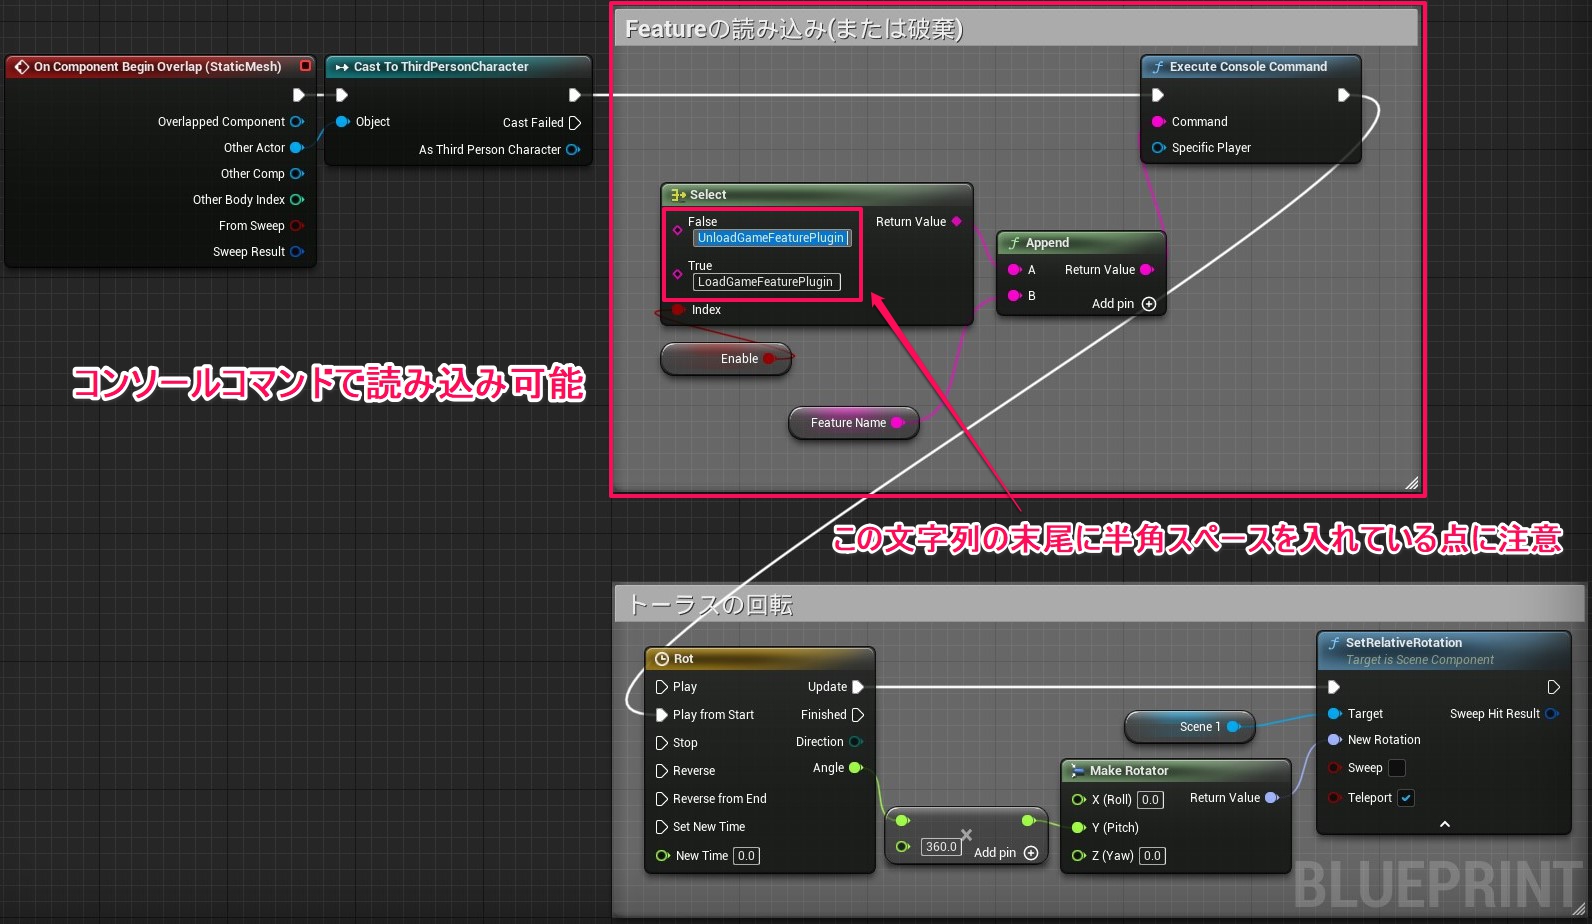
グレイマンが動く中に、自作機能の読み込みと破棄をするポートを設置しました。
UIの入力を受け付けると、グレイマンの位置にエフェクトを発生させています。
同時に、グレイマンのジャンプをスローにするという機能です。
早速作りましょう。
UE5でプロジェクトを作り、Game Featuresプラグインを有効にします。
Third Personテンプレートを使用して、MyProjectというプロジェクト名を付けました。
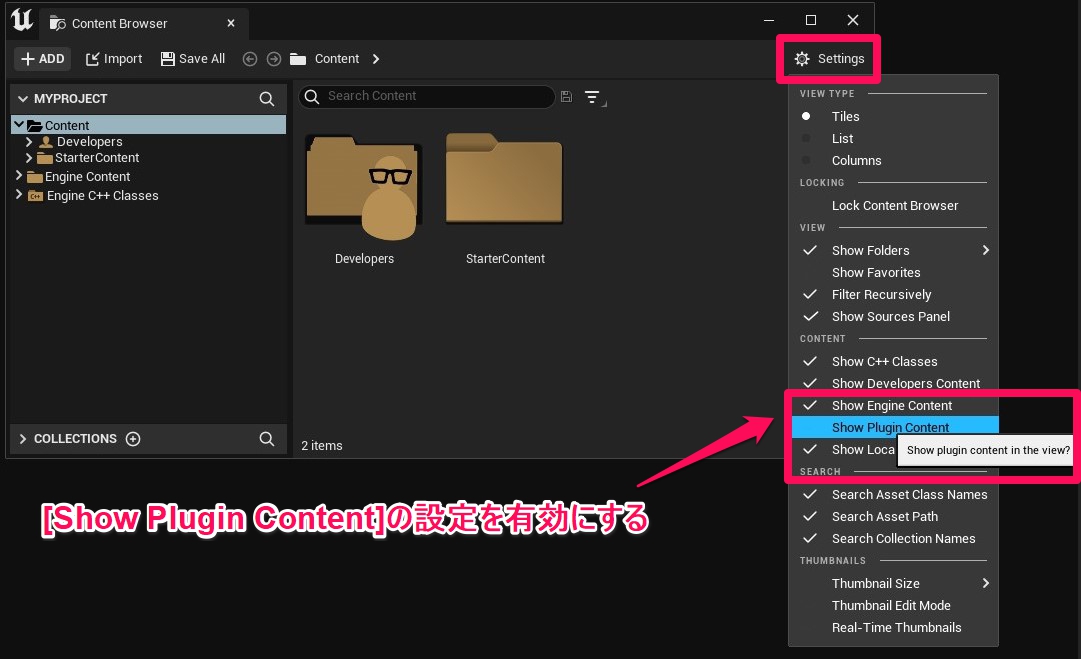
最初に、コンテンツブラウザの設定から、「Show Plugin Content」を有効にしておきます。

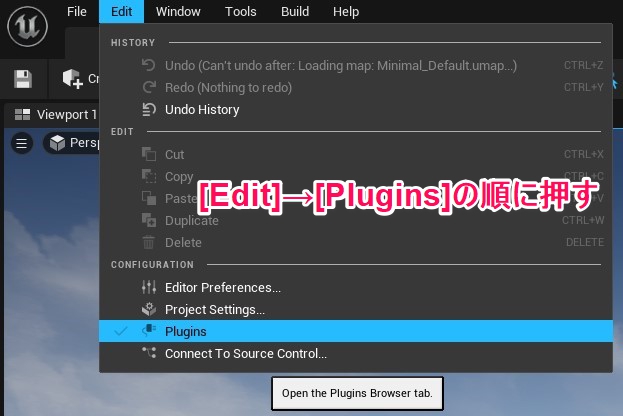
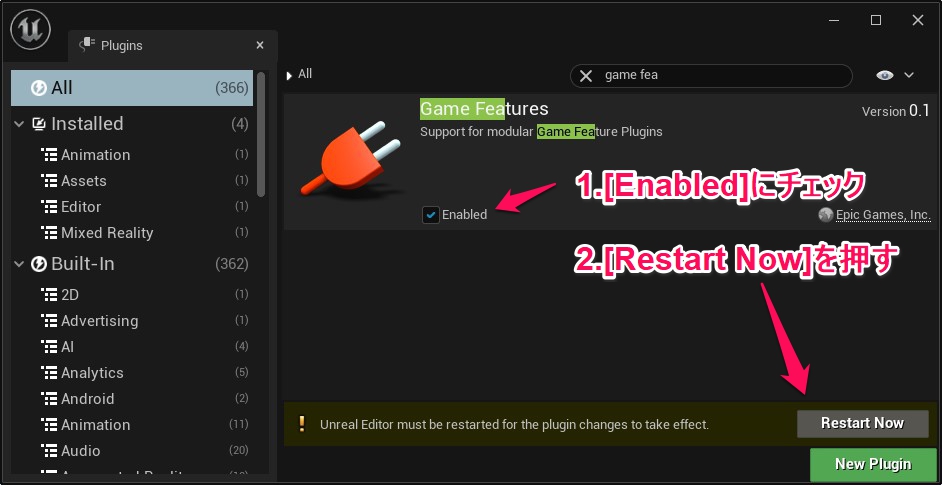
左上のメニューからEdit、Pluginsと進み、「Game Features」と検索して、出てきたプラグインのEnabledにチェックを付けましょう。
UE4経験者の方であれば、プラグインを有効にする手順は特に変わってないことに気づくかと思います。
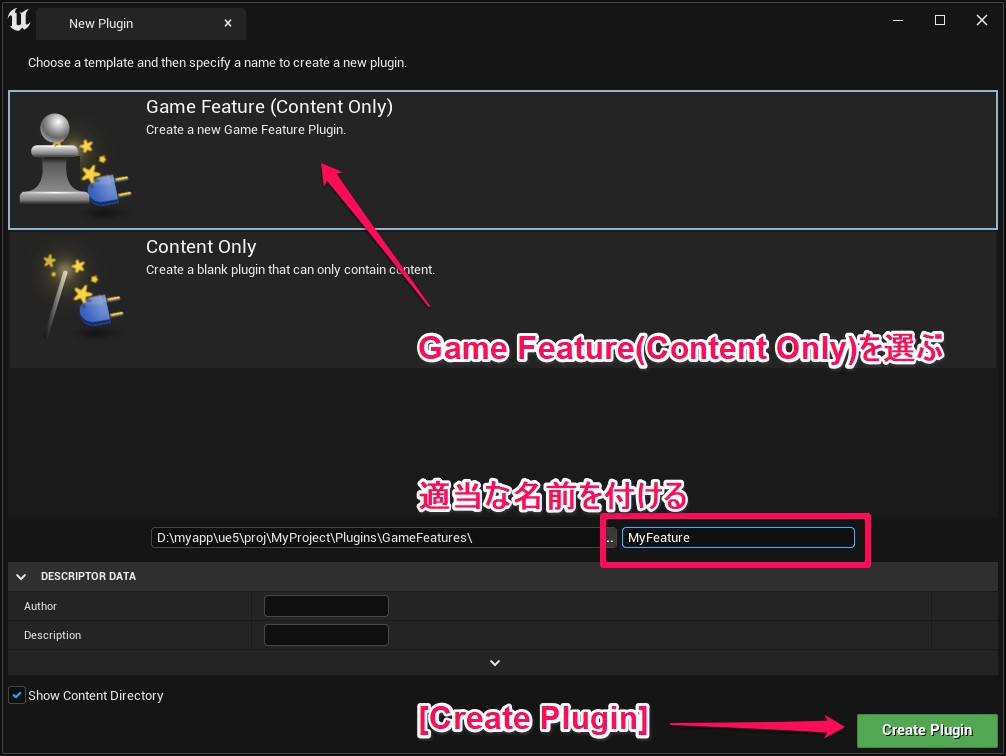
次に、自分のFeatureプラグインを作成します。
先ほどと同じように、Edit、Pluginsと進んで、今度はNew Pluginを押します。
すると、Game Features (Content Only)という項目が選べるようになっているので、これを選んで自分だけの名前を付けます。
そして、Create Pluginを押せば、新しいGame Featureの完成です。
MyFeatureを作りました。
まず、画面にUIを追加するアクションを作ってみましょう。
プラグイン有効化とともに即画面に出すというアクションにします。
ワールドにアクセスするためのアクションとして古代の谷のサンプルが非常に使いやすいので、古代の谷\Source\AncientGame\GameFeaturesフォルダからGameFeatureAction_WorldActionBaseクラスの.hと.cppをコピーして基底クラスにしましょう。
このクラスを使うことで、GEngine->GetWorldContexts()によって得られるWorldContextにアクセスできるようになります。
これを以下のように継承すれば完成です。
1 2 3 4 5 6 7 8 9 10 11 12 13 14 15 16 17 18 |
UCLASS(meta = (DisplayName = "Add UI")) class MYPROJECT_API UMyAction_AddUi : public GameFeatureAction_WorldActionBase { ~中略 // この中でUIを削除 virtual void OnGameFeatureDeactivating(FGameFeatureDeactivatingContext &Context) override; // UIを画面に出す virtual void AddToWorld(const FWorldContext &WorldContext) override; // 生成するUIクラス。 TSubclassOf<UUserWidget> WidgetClass; // 生成したUIを保持しておく UUserWidget *WidgetInstance; }; |
1 2 3 4 5 6 7 8 9 10 11 12 13 14 15 16 17 18 19 20 21 22 23 24 25 26 27 28 29 30 31 32 33 34 35 36 37 38 39 40 41 42 43 44 45 46 47 48 49 50 51 52 53 54 55 56 57 58 59 60 |
#include "MyAction_AddUi.h" #include "Blueprint/UserWidget.h" #include "Kismet/GameplayStatics.h" #include "GameFramework/PlayerController.h" void UMyAction_AddUi::OnGameFeatureDeactivating(FGameFeatureDeactivatingContext &Context) { Super::OnGameFeatureDeactivating(Context); if (WidgetInstance != nullptr) { UWorld *World = WidgetInstance->GetWorld(); if (World != nullptr) { APlayerController *PlayerController = UGameplayStatics::GetPlayerController(World, 0); if (PlayerController != nullptr) { FInputModeGameOnly Mode; Mode.SetConsumeCaptureMouseDown(true); PlayerController->SetInputMode(Mode); PlayerController->bShowMouseCursor = false; } } WidgetInstance->RemoveFromViewport(); WidgetInstance = nullptr; } } void UMyAction_AddUi::AddToWorld(const FWorldContext &WorldContext) { UWorld *World = WorldContext.World(); if ((World == nullptr) || (!World->IsGameWorld())) { return; } if (!WidgetClass) { return; } if (WidgetInstance != nullptr) { return; } WidgetInstance = CreateWidget(World, WidgetClass); WidgetInstance->AddToViewport(); APlayerController *PlayerController = UGameplayStatics::GetPlayerController(World, 0); if (PlayerController != nullptr) { FInputModeGameAndUI Mode; Mode.SetLockMouseToViewportBehavior(EMouseLockMode::DoNotLock); Mode.SetHideCursorDuringCapture(false); PlayerController->SetInputMode(Mode); PlayerController->bShowMouseCursor = true; } } |
build.csにも、UMGモジュールを追加します
|
|
PublicDependencyModuleNames.AddRange(new string[] { "UMG" }); |
実際のUIは好きなものを作って構いません。今回はボタンを一個配置して、そのボタンを押すとグレイマンから矢印が飛んでいく機能を付けました。

次に、ThirdPersonCharacterのジャンプを遅くするアクションを追加してあげます。
|
|
UCLASS(meta = (DisplayName = "Add UI")) class MYPROJECT_API UMyAction_ChangeJumpSpeed : public GameFeatureAction_WorldActionBase { ~中略 // GravityScaleとJumpZVelocityを書き換え virtual void AddToWorld(const FWorldContext &WorldContext) override; // データアセット側から値を設定 float GravityScale; float JumpZVelocity; }; |
1 2 3 4 5 6 7 8 9 10 11 12 13 14 15 16 17 18 19 20 21 22 23 24 25 26 27 28 29 30 31 32 33 34 35 |
#include "MyAction_ChangeJumpSpeed.h" #include "Kismet/GameplayStatics.h" #include "GameFramework/Character.h" #include "GameFramework/CharacterMovementComponent.h" #include "GameFramework/PlayerController.h" void UMyAction_ChangeJumpSpeed::OnGameFeatureDeactivating(FGameFeatureDeactivatingContext &Context) { Super::OnGameFeatureDeactivating(Context); } void UMyAction_ChangeJumpSpeed::AddToWorld(const FWorldContext &WorldContext) { UWorld *World = WorldContext.World(); if ((World == nullptr) || (!World->IsGameWorld())) { return; } APlayerController *PlayerController = UGameplayStatics::GetPlayerController(World, 0); if (PlayerController != nullptr && PlayerController->GetViewTarget() != nullptr) { ACharacter *Character = Cast<ACharacter>(PlayerController->GetViewTarget()); if (Character != nullptr) { ACharacter *Character = Cast<ACharacter>(Actor); if (Character != nullptr) { Character->GetCharacterMovement()->GravityScale = GravityScale; Character->GetCharacterMovement()->JumpZVelocity = JumpZVelocity; } } } } |
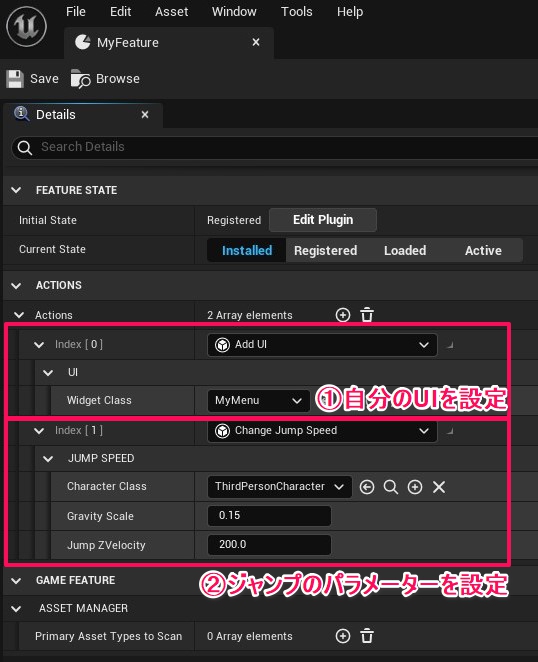
↓出来上がったMyFeatureには、自分のUIとジャンプのパラメーターを設定。
MyFeatureの読み込みと破棄をするBPを以下のように組み、レベルに配置したら完成です。

ということで、最初の動画と同じものができました。
Game Featuresプラグインは非常にシンプルなので、ぜひ一度触ってみてはいかがでしょうか。
以上、Game Featuresプラグインのお話でした。


 [UE5]キャラクター基準でカメラの相対方向を検出する方法
2026.04.29UE
[UE5]キャラクター基準でカメラの相対方向を検出する方法
2026.04.29UE
 [UE5]TopDownテンプレートのバリアントオプション「Strategy」を改造して遊んでみよう!
2026.04.22UE
[UE5]TopDownテンプレートのバリアントオプション「Strategy」を改造して遊んでみよう!
2026.04.22UE

 「UE技術サポート」のご案内
2026.04.16お知らせ
「UE技術サポート」のご案内
2026.04.16お知らせ