| 執筆バージョン: Unreal Engine 4.21 |
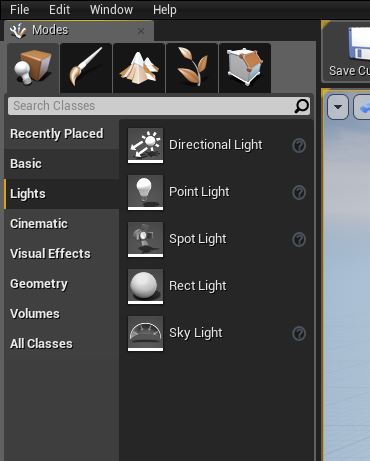
レベルエディタにある配置ツールは以下の画像のように

Basic/Lights/Volumesなどの項目に別れ、目的のアクターを用意に発見し、配置することができるようになっています。 ところが自前で作成したアセットなどは、これらの項目に振り分けられず、RecentlyPlaced(最近配置したもの)かAll Classes(すべてのクラス)からしかアクセスすることができません。 今回の記事はここに独自の項目とアセットを追加する方法をご紹介します。 ※今回の記事はC++とPluginを使用します。
登録するアクターの作成
※すでに用意されているクラスを登録したい場合はこの後は必要ありません。 まずは配置ツールに追加したいクラスを作成します。 エディタの「ファイル->新規C++クラス…」などから新規のC++を作成します。 作成するクラスはAActorの派生クラスである必要があります。(直接の子クラスでなくて構いません) 今回はMyActorというクラスを作成しました。プロジェクト名はtest421codeです。
1 2 3 4 5 6 7 8 9 10 11 12 13 14 15 16 17 18 19 20 21 22 23 24 25 26 |
// Fill out your copyright notice in the Description page of Project Settings. #pragma once #include "CoreMinimal.h" #include "GameFramework/Actor.h" #include "MyActor.generated.h" UCLASS() class TEST421CODE_API AMyActor : public AActor { GENERATED_BODY() public: // Sets default values for this actor's properties AMyActor(); protected: // Called when the game starts or when spawned virtual void BeginPlay() override; public: // Called every frame virtual void Tick(float DeltaTime) override; }; |
1 2 3 4 5 6 7 8 9 10 11 12 13 14 15 16 17 18 19 20 21 22 23 24 25 |
// Fill out your copyright notice in the Description page of Project Settings. #include "MyActor.h" // Sets default values AMyActor::AMyActor() { // Set this actor to call Tick() every frame. You can turn this off to improve performance if you don't need it. PrimaryActorTick.bCanEverTick = true; } // Called when the game starts or when spawned void AMyActor::BeginPlay() { Super::BeginPlay(); } // Called every frame void AMyActor::Tick(float DeltaTime) { Super::Tick(DeltaTime); } |
項目を追加するためのプラグイン作成
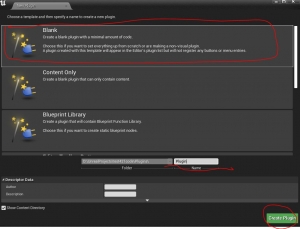
ここの項目を追加できるタイミングが限られているため、項目の追加を行うプラグインを作成します。 エディタからは「編集->Plugins」からプラグイン一覧のウィンドウを出し、右下の「New Plugin」を押すと新規プラグインの作成ウィンドウが出るので、 Blancのテンプレートを選択肢て名前を設定し、Create Pluginで作成します。
プラグインが作成できたら、プラグイン名.upluginファイルを開き、ModulesのTypeを”Runtime”から”Editor”にLoadingPhaseを”Default”から”PostEngineInit”に変更します。 次にプラグイン名.Build.csのPublicDependencyModuleNamesには登録したいクラスを作成した先のModule名とエディタの機能を使うので”UnrealEd”を記述します。 今回はプロジェクト側にMyActorというクラスを作成したのでプロジェクト名であるtest421codeを記述しました。
|
|
PublicDependencyModuleNames.AddRange( new string[] { "Core", "UnrealEd", "test421code", // ... add other public dependencies that you statically link with here ... } ); |
最後にプラグイン名.cppを開き項目の追加コードを記述します。
1 2 3 4 5 6 7 8 9 10 11 12 13 14 15 16 17 18 19 20 21 22 23 24 25 26 27 28 29 30 31 32 33 |
#include "MyPlugin.h" #include "PlacementMode/Public/IPlacementModeModule.h" #include "MyActor.h" #define LOCTEXT_NAMESPACE "FMyPluginModule" void FMyPluginModule::StartupModule() { // This code will execute after your module is loaded into memory; the exact timing is specified in the .uplugin file per-module int Priority = 45; FPlacementCategoryInfo Info( LOCTEXT("MyCategory", "MyCategory"), "MyCategory", TEXT("PMMyCategory"), Priority ); IPlacementModeModule::Get().RegisterPlacementCategory(Info); IPlacementModeModule::Get().RegisterPlaceableItem(Info.UniqueHandle, MakeShareable(new FPlaceableItem(nullptr, FAssetData(AMyActor::StaticClass())))); } void FMyPluginModule::ShutdownModule() { // This function may be called during shutdown to clean up your module. For modules that support dynamic reloading, // we call this function before unloading the module. if (IPlacementModeModule::IsAvailable()) { IPlacementModeModule::Get().UnregisterPlacementCategory("Video"); } } #undef LOCTEXT_NAMESPACE IMPLEMENT_MODULE(FMyPluginModule, MyPlugin) |
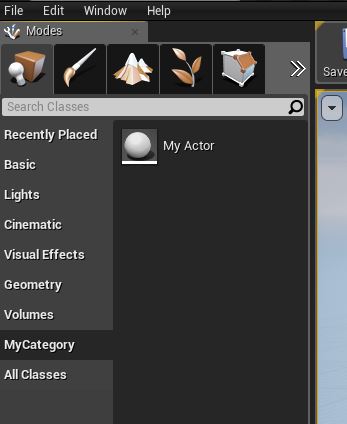
これで配置ツールに登録されました。

続いてコードの解説です。
|
|
#include "PlacementMode/Public/IPlacementModeModule.h" #include "MyActor.h" |
まずは必要なクラスをincludeします。 次にStartupModuleでこのプラグインの初期化時にメニューに項目を追加します。 IPlacementModeModule::Get().RegisterPlacementCategory(Info);で登録し、登録する際の項目名や何番目に項目を表示するかなどはFPlacementCategoryInfoで定義します。 そして項目にアセットを登録するには IPlacementModeModule::Get().RegisterPlaceableItem()を使用します。 ShutdownModuleの中ではUnregisterPlacementCategoryで追加した項目を削除するコードを記述しています。 コード内に出てくるPriorityは上から何番目に項目を追加するかの指定に使用します。ただし第5引数にfalseを指定すると常に一番上や一番下など定位置に配置できます。 デフォルトで用意されている項目のPriorityは以下のとおりです。
| 項目名 |
Priority |
| Recently Placed |
常に上 |
| Basic |
10 |
| Lights |
20 |
| Cinematic |
25 |
| Visual Effects |
30 |
| Geometry |
35 |
| Volumes |
40 |
| All Classes |
50 |
今回は45に設定していたのでVolumesとAll Classesの間に項目が作られました。 なお、すでにあるものと同値にすると基本的にはこのプラグインで追加したものがあとに来るようですが、同Priority内での順序はModuleのロード順になるためほぼ不定となりそうです。


 [UE5]マテリアルのSDFとは?画像から考える距離場のしくみ
2025.12.03UE
[UE5]マテリアルのSDFとは?画像から考える距離場のしくみ
2025.12.03UE
 [UE5]Color CurveをMaterial Functionで設定するには
2025.04.09その他
[UE5]Color CurveをMaterial Functionで設定するには
2025.04.09その他
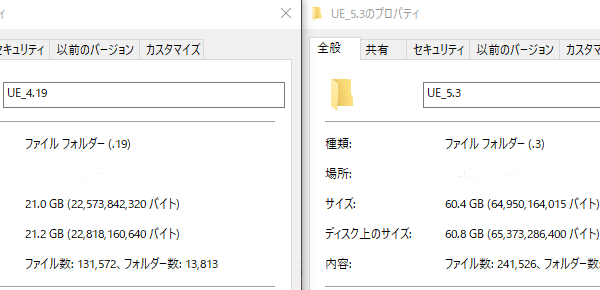 [UE4][UE5]開発環境の容量を少しでも減らす
2024.08.14UE
[UE4][UE5]開発環境の容量を少しでも減らす
2024.08.14UE